Importing Power BI Service Dataflow Error

Whilst recently setting up stagining and production processes for a Power BI application, I had to export and import a dataflow from staging into production, exorting the json from staging and importing it into the production workspace.

In doing so, I ran across a “Can’t Publish Dataflow” For security reasons, AllowNativeQueries should be set to false on import(can be set to true after import from the Power BI service). Please set AllowNativeQueries to false, and try again. Activity ID is xxxxx

Resolution

Edit the downloaded json file, searching for allowNativeQueries which will be set to “true”, change this to false and save the file.

When you attempt to import the file again into the destination workspace, it should suceed, however now native queries are not enabled. In order to enable native queries once the dataflow has been sucessfully imported you need to open the dataflow in the online editor and you will be presented with an option to enable native database query.

Revive the blog

Well, I am back…

It has been sometime since I have used this blog, I started this blog many moon’s ago to document the odd technical problem I came across, almost as a reference for myself and hoped that others would find it useful.

Over time my time spent on the blog reduced and I lost access to it, recently I have been doign quite abit of work in the Power Platform and Mordern workplace and hit afew problems I wanted to document, so I thought now would be a good time to revice the blog. Time is difficult for me to find but I will try and post some things I run across. and update the blog alittle.

Blogging seems to have come along sicne I last had a go, so might take me some time to figure it all out again, but hear goes.

Hyper-V Damaged VHDX MBR

So today was a fun day, one of our development office host servers had a storage issue this week and fried the volume where all the development virtual machines were running on.

I managed to fix the storage volume however I found a number of VM’s still would not start. The error indicated there was no boot volume.

To fix the issue and repair a Windows 2012 R2 Start-up issue I followed the below steps:


1. Put the Windows Server 2012 R2 installation disc in the disc drive, and then start the computer.
2. Press any key when the message indicating “Press any key to boot from CD or DVD …”. appears.
3. Select a language, time, currency, and a keyboard or another input method. Then click Next.
4. Click Repair your computer.
5. Click the operating system that you want to repair, and then click Next.
6. In the System Recovery Options dialog box, click Command Prompt.
7. Type Bootrec /RebuildBcd, and then press ENTER.

Dell Server Update Utility ( SUU ) v.14.10.200.123 A01

Dell has released an updated version of Dell Server Update Utility, The SUU is an application used to help patch Dell PowerEdge servers. It will compare currently installed drivers and firmware with those available on the DVD or mounted iso file.

It could be found here:


http://www.dell.com/support/home/uk/en/ukbsdt1/Drivers/DriversDetails?driverId=T2J25

Update: 26/12/2014

A new updated version (14.12.200.69) is available here 


SCVMM 2012 R2 Update Rollup 4 Pulled

So another normal day at work, too much to do not enough time. But I planned to update my VMM 2012 R2 servers today to the latest update rollup package.


Update Rollup 4 for System Center 2012 R2 Virtual Machine Manager


https://support.microsoft.com/kb/2992024?wa=wsignin1.0


However I could not find the download for the VMM server anywhere, I could find the admin console update only. My understanding is that it was pulled late last night or early morning (depending on where you live) because of installation issues upgrading VMM servers using Windows Server 2012.

I would expect the update to be re-released next week

Creating a wildcard webserver certificate with your internal Microsoft CA

It is sometimes necessary to issue a wildcard certificate from your internal Microsoft CA, I had such a requirement this week and thought it would make a nice blog post.

The post assumes you have a Enterprise CA already deployed and a web server template deployed and available for enrolment.

First we need to create the certificate request that will be issued to your CA.

1. Logon to a Windows 2008 R2 or Windows 7 domain member

2. Open the certificates MMC snap-in


image


image


image


image


image


Now create the certificate request

3. Right click the Certificates folder which is found under the personal folder

4. Select All Tasks > Advanced Options > Create Custom Request


image


5. In the Certificate Enrolment Wizard Click Next

image


6. In the Certificate Enrollment Page select Custom Request > Proceed without enrolment Policy and then select Next


image


7. In the Custom Request Page select (No template) Legacy Key from the drop down and then select Next

image


8.On the Certificate Information Page select the Details link, then select the Properties button

image


9. On the General tab complete the Friendly name field and optionally you can add a description for the certificate.


image


10. Select the Subject tab and fill in the relevant information as described below


Field

Value

Description

Common Name

*.contoso.com

The name of the certificate. This field is used to identify the certificate. Adding the * before the domain name indicates a wildcard certificate for that domain.

Organizational Unit

IT

The name of the OU. In most cases this is the IT department

Organization

Contoso Corp

The name of the Organization where the certificate is for.

Location

Seattle

The location of the registered location of the organization.

State

WA

The County/State of your organization

Country

US

The country of your organization


image


image


11. Select the Extensions tab

12. In Key usage select Digital and Key encipherment


image


13. On the Private Key tab set the key size to 4096 and select the option Make private key exportable.


image


14. Under Key type select Exchange

15. Select OK


image


15. On the certificate Information page select Next

image


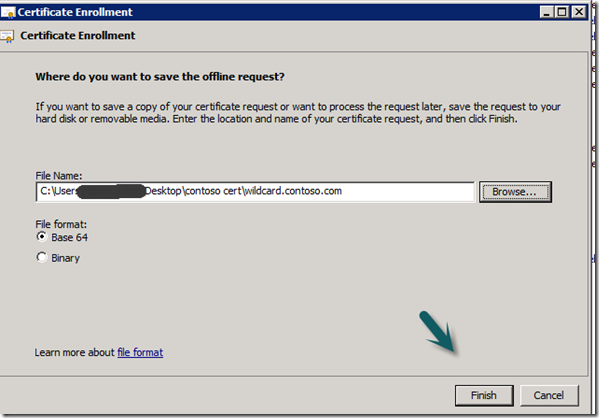
16. Save the request file

image

SNAGHTML2cebb4ae


That’s the certificate request file done, which was nice and easy even though there was a number of steps, we next need to use this request to generate the rest of the certificate on the CA.


17. Browse to your internal CA web enrollment pages

18. Select Request a certificate

image

19. Select advanced certificate request


image


20. Select the Submit a certificate request link


image


21.Open the previously created request file in notepad and copy all the data in it to clipboard.

22. Past the clipboard into the Saved Request box

23. Select the web server template

24. Click submit

25. You might get a popup box asking for confirmation, select yes

image

image


When the CA done it’s job it will offer you the ability to download the certificate

26. Select Base 64 and select Download certificate


image


Now back in the local machines Certificate snap-in

27. Right click the Certificates folder in the personal folder store and select import and import the file you downloaded from the CA


image

SNAGHTML2cf4fb12

image

image


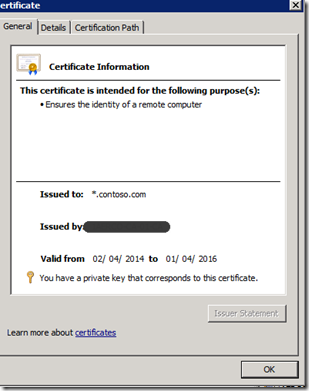
Now check in the certificate store you should be a valid certificate with a private key


SNAGHTML2cf6087b

Install Untrusted SCOM Gateway Servers


So today I needed to deploy a System Center Operations Manager Gateway in our perimeter network to support external client connections from third party locations and environments that are not part of our internal corp domain. I thought I would write up the vast majority of my steps for future reference and hopefully to help you. I used primarily two sources of information in additional to my general knowledge, both are listed at the bottom of this post.

1. Deploy Windows Server 2012 R2 standalone Server

2. Install Updates

3. Rename the server

4. Host File:

It is very important that all servers are able to resolve the FQDN of each other. Typically this is done through DNS, but if DNS is not possible you should have all the servers setup in a host file.

a. On all of the Management group servers that are unable to use DNS to resolve the FQDN of the Gateway Server edit the host file found locally in “C:\Windows\System32\drivers\etc”

b. Open file with Notepad as a admin with elevated rights

c. Enter the IP address and FQDN of the Gateway servers

d. On all of the Gateway servers enter all the Management group servers that the gateway will connect to

On the Management Server you should have something like:

192.168.0.100 managementserver1.domain1.com

192.168.0.101 managementserver2.domain1.com

On the Gateway Server you should have

99.100.99.100 gatewayserver1.domain2.com

99.100.99.101 gatewayserver2.domain2.com

Save the file and close Notepad.

5. Firewall:

Before you begin you need to make sure that if there are any firewalls between the servers that port 5723 is open.

6. Certificates:

Deploying gateway servers requires certificates on all servers in the management group and all gateway servers. These can be internal via a CA or external from a third party vendor like VeriSign. I use an internal CA which is already setup to issue SCOM Gateway Certificates, you can find more information on how to set this up from the sources link at the bottom.

7. Ensure The Management Servers has an Ops Manager Certificate install in it Personal Computer Store, if you do not have one, enrol.

8. Gateway Root Certificate Import

On the Gateway Server, install the CA root certificate.

a. Browse to https://<CA Issuing Server>/certsrv

b. Authenticate

c. Select the “Download a CA certificate, certificate chain, or CRL link on the web page.

d. Select “Base 64” as the encoding method

e. Select “Download CA certificate chain” and save the file.

f. Open MMC and add the certificate snapin for the local computer.

g. Right click the Trusted Root Certification Authorities\Certificates store and select All Tasks\Import, import the downloaded file into the store. This will ensure that any certificate issued by the internal CA will be trusted by this machine.

9. Gateway Server SCOM Certificate

a. From the Gateway server browse to https://<CA Issuing Server>/certsrv

b. Select “Request a Certificate”

c. Select “Advanced Certificate Request”

d. Select “Create and Submit a request to this CA” If you do not get a prompt check your ActiveX settings as you should get a prompt.

e. Select your Operations Manager certificate form the “Certificate Template” option (Drop Down).

f. In the name field populate with the FQDN of the Gateway Server in the server is in a domain, if it is in a workgroup use the server name..

g. Select PKCS10 as the request format

h. Provide a friendly name so you can identify the certificate at a later date.

i. Select “Submit”

j. Select yes to any popups

k. Select “Install this certificate”

10. Move the Certificate to the correct location

a. On the gateway server in the Certificate MMC for the user export the new certificate to file exporting the private key and import into the personal certificate store for the local computer.

b. Restart the health service (Microsoft Monitoring Agent)

11. Gateway Approval Tool

Now that we have our certs in place we need to run the gateway approval tool on the SCOM RMS server. In the installation media in SUPPORTTOOLS under your respective processor folder you will find two files:

Microsoft.EnterpriseManagement.GatewayApprovalTool.exe

Microsoft.EnterpriseManagement.GatewayApprovalTool.exe.config

a. Copy both of these files to the SCOM install directory under <installed Drive>Program Files\System Center 2012 R2\Operations Manager\Setup and run the following command in that folder from an elevated command prompt.

Microsoft.EnterpriseManagement.gatewayApprovalTool.exe /ManagementServerName=<FQDN of RMS box> /GatewayName=<FQDN of Gateway Server> /Action=Create

Note: If you are installing a Gateway server in a domain then use the FQDN of the gateway server, if you are installing the gateway in a workgroup just using the server name.

Once complete the command prompt should say something like “The approval of the server <gateway server FQDN> completed successfully”

12. Install Gateway Role

Now we have everything in place to deploy the gateway role.

a. Using the Operation Manager Install media install the “Gateway Management Server” Role using the link on the install media splash screen.

b. Once installed, go back to the SCOM console, in Administration view under Management servers select the properties of the new gateway server and in the security tab enable the server proxy.

c. On the gateway server we need to tell SCOM which certificate to use for authentication, by running the MOMCERTIMPORT.exe tool. In the installation media in SUPPORTTOOLS under your respective processor folder run the MOMCERTIMPORT.exe tool from an elevated command prompt. You should see the cert that you installed previously. Select the correct certificate and Click OK

Sources:

http://jimmoldenhauer.blogspot.co.uk/2012/11/scom-2012-install-and-configure-gateway.html

http://technet.microsoft.com/en-us/library/hh456445.aspx

System Centre Virtual Machine Manager 2012 R2 The object was not found on the server

Issue:

When setting or amending a configuration setting in SCVMM 2012 R2 against a Hyper-V Clustered VM I got a error which looked something like


Error (2915)

The Windows Remote Management (WS-Management) service cannot process the request. The object was not found on the server (SERVER NAME)

Unknown Error (0x80338000)

image

This put the VM in the console into a failed state, the natural first action is to try and repair the VM, this generates another error which looks like:

Error (12711)

VMM cannot complete the WMI operation on the server (HOST Server Name) because of an error (MSCluster…….) The cluster resource could not be found.

the cluster resource could not be found (0x138F)


image


1.Logon to one of the host servers and from a Powershell session run:

2.Import-Module FailoverClusters

Get-ClusterResource -c CLUSTERNAME | where {$_.resourcetype.name -eq ‘virtual machine configuration’} | Update-ClusterVirtualMachineConfiguration

3.From VMM console refresh cluster

4.From VMM console repair VM